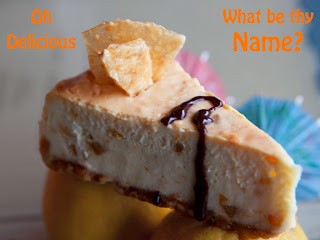
Salvador Molly’s Orange Sunshine Cheesecake
Orange Confit
Ingredient
Oranges (whole) 2 ea
Water as needed
Sugar 6 oz
Water 6 oz
Procedure
1. Place whole oranges in a pot. Cover with cold water and bring to a boil.
2. Strain out water.
3. Return oranges to pot and again cover with cold water and bring to a boil.
4. Strain out water.
5. Return oranges to pot and cover with cold water a third time. Bring to a boil.
6. Strain out water.
7. Cut oranges into eighths and return to pot
8. Add sugar and water and bring to a boil
9. Reduce heat and simmer, stirring occasionally until peels become translucent and syrup becomes heavy (about 2 hours)
10. Rough chop to about the size of a large pea.
11. Refrigerate
Notes
Orange confit has a very powerful flavor to it. The first part where you are boiling the oranges three times is important in order to open the cells in the peel without splitting the orange and losing the pulp and juice. It also softens the peel allowing it to absorb the syrup and juice in the final step. After you cut the oranges and start the final simmer, the concept is for the orange pulp and juice to break down and combine with the simple syrup and infuse into the peel fortifying the flavor and candying the rind. This will take a lot of patience and it cannot be rushed. If the syrup is getting too heavy but the rind is not yet translucent you can add small amounts of water to thin it out, but done properly it should be a pretty heavy syrup. Note the peel will not become clear but it will have a quality to it where you can kind of see into it a bit…translucent.
Toasted Cashew Crust
Ingredient
Cashews 5 oz
Graham Cracker Crumbs 3 oz
Sugar 2 oz
Butter 3 oz
Procedure
1. Wash cashews if salted to remove salt. Dry
2. Place cashews on cookie sheet and bake at 350 F until golden
3. Place cashews in food processor and rough chop
4. Transfer cashews to mixing bowl and add graham cracker crumbs and sugar. Mix
5. Pour in melted butter and mix thoroughly.
Notes
The degree of chop on the cashews is important. You don’t want a powder or a fine chop. Leaving the chop a bit larger will add texture that contrasts well with the cheesecake. The amount of butter may vary depending on the amount of natural moisture in the cashews. Proper consistency can be determined by squeezing a handful of crust in your hand and releasing your grip. The crust should hold its shape but should break apart if you touch it with your finger. It should not be greasy. Humid or rainy days can also add moisture so while three ounces of butter will usually be the amount it may be necessary to vary it slightly depending on the conditions.
Orange Confit Cheesecake Base
Ingredient
Cream Cheese 2 lb.
Sugar 9 oz
Eggs (lg) 3 ea.
Heavy Cream 7 ½ oz
Vanilla Extract ½ oz
Orange Confit 11 oz
Procedure
1. Put cream cheese and sugar in a mixing bowl and mix with a paddle attachment until smooth and creamy.
2. Scrape the bowl very well (including paddle)
3. Add eggs and mix until smooth
4. Scrape well
5. Add cream and vanilla and mix until smooth
6. Scrape well
7. Add orange confit and mix until just incorporated
Notes
This technique is what is known as the “creaming mixing method”. It’s the same procedure used to make cookies, shortbreads, etc. What is really important here is the scraping. You really have to scrape the bowl and the paddle very well. Make sure you get all the way to the bottom and really get it as pulled away from the sides as possible when you scrape. This will help ensure and even distribution of ingredients and avoid lumps of cream cheese in your cheesecake. I recommend medium speed on the mixer because you want to ensure it is thoroughly incorporated but minimize the amount of air worked into the base. As with any recipe where the creaming mixing method is used it’s vital that when you add the garnish (in this case the orange confit) you mix until it’s just incorporated. It should only take two to three rotations of the paddle to accomplish this. The reason why is to avoid discoloration and overdevelopment of the base.
Assembly and Baking
Procedure
1. Prepare a 10” pan. Spray the inside bottom and sides with cooking spray, place parchment on the bottom (inside), and spray again.
2. Place the crust in the pan and evenly distribute to cover the entire bottom. Pack down with something flat. A soufflé dish works great for this
3. Pour cheesecake base into pan and level off
4. Place pan on a cookie sheet and fill the sheet halfway with water
5. Bake at 300 F until the top is flat
6. Remove from oven and allow to cool.
7. Freeze or refrigerate
Notes
I prefer to use a solid 10” pan. Springform pans can allow water into the cake during the baking process but you do not have to freeze the cheesecake to get it out of the pan. If you opt for a springform you will want to wrap the pan in tin foil to avoid water seepage. Simply place the pan on a sheet of tin foil and roll the foil up the side of the pan until the seam is covered. The water bath is important to avoid a soufflé effect from the eggs and to ensure a consistent cook. Keep an eye on it to make sure the water doesn’t evaporate away. If it gets low simply add some more hot water. The way to check the doneness is by the flattening of the top. The cake will cook from the outside in and around the edges there will be a slight rise from the eggs leaving a depression in the middle. As the cake continues to cook the middle will rise up as well. When it becomes flat the cake is done. If the top splits it’s overdone.
To unmould: If you used a springform pan place it in the refrigerator for several hours and allow to set before removing the outer ring. If you used a solid pan you will have to freeze the cake overnight. Don’t worry about a loss of quality. This cake freezes beautifully and any loss will be very minimal. Once it it frozen place it on a stove burner just long enough to melt a thin part of the cake so is has some viscosity (no more than 10 seconds or so). Run a knife around the edge to loosen it and then turn the pan over and smack the pan on a table. It should fall right out but if not just put it back on the burner for another 10 seconds and try again. Don’t be afraid to really smack the pan. It will be fine. Let it thaw a bit and cut it to the portion size you prefer. For a clean professional cut you will want to do it when it’s still pretty frozen. Heat your knife under hot running water or an open flame and cut while the knife is hot. Clean the knife after each cut and reheat to avoid residual build up. Note that you just have to get the knife well warmed…you don’t need the knife to glow.

